So, what’s a hydroponics weed system? Basically, it’s a way to grow cannabis without any soil. Your plants get all their food from nutrient-packed water. This hands-on method usually means faster growth and bigger yields because you have total control over what your plants eat. It’s a real game-changer if you’re serious about getting the most from your grow.
Why Everyone Is Talking About Hydroponics
Let’s get right to it. Growing weed without soil might sound a little weird, but it’s just smart science. More and more growers, from home hobbyists to commercial pros, are switching to hydroponics for some really good reasons. It all comes down to control, speed, and quality.
Imagine getting more harvests in a year and pulling down consistently awesome buds every time. That’s what you can do with hydro. By feeding your plants directly through their roots with a perfectly balanced nutrient solution, you’re cutting out the middleman, which is the soil. This direct access to food means your plants spend less energy looking for nutrients and more energy on growing bigger and faster.
The Big Wins of Going Soilless
One of the first things you’ll see is the explosive growth. Plants in a well-managed hydro setup can mature way faster than their soil-grown siblings. This is a huge plus for any home grower because it means you can squeeze more grow cycles into a year.
On top of that, it’s a much cleaner process. Without dirt, you can say goodbye to many common soil-borne pests and diseases. That means less time dealing with problems and a healthier environment for your plants right from the start.
The real power of hydroponics is the total control it gives you. You become the master of your plant’s diet, fine-tuning the nutrients to unlock the full potential of those awesome feminized or autoflowering cultivars from Pacific Seed Bank.
Bumping Up Your Yields and Quality
This level of control has a direct impact on your final product. There’s a reason hydroponics has become a powerhouse method in the cannabis vertical farming world. It delivers quicker growth cycles and can produce seriously dense buds.
Because you’re providing nutrients so precisely, yields are often 20-30% higher per square foot compared to regular farming. It also uses up to 80% less freshwater, which makes it a surprisingly efficient choice. A hydroponics weed system is about working smarter, not harder, to get amazing results.
Choosing the Right Hydroponics Setup for You
Alright, you’re sold on the idea of hydroponics. The problem is, you’re now looking at a bunch of acronyms like DWC, NFT, and Ebb & Flow, and it all feels a bit much.
Don’t sweat it. Picking the right hydroponic system isn’t as complicated as it seems. It’s just about matching the setup to your space, your budget, and how much time you want to spend tinkering. Think of it like buying a car. You wouldn’t get a huge pickup truck if you live in a city apartment with only street parking. Same logic here.
Let’s break down the most popular options in simple terms so you can find the perfect fit.
H3: Deep Water Culture (DWC)
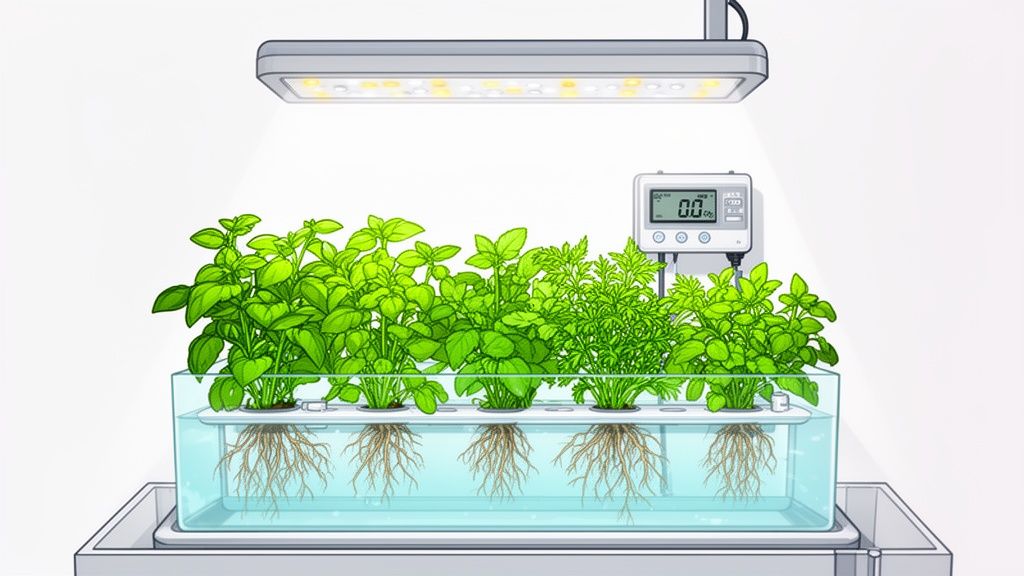
If you’re just starting out, Deep Water Culture (DWC) is your new best friend. It’s one of the simplest and most budget-friendly ways to get started with soilless growing. The whole idea is super simple.
Your plants sit in net pots filled with a medium like clay pebbles, and their roots hang down directly into a tank of nutrient-rich, oxygenated water. An air pump and air stone bubble away 24/7, just like in a fish tank, making sure the roots get a constant supply of oxygen.
- Who it’s for: Beginners who want a low-cost, low-maintenance way to get into hydro.
- The upside: It’s cheap to build, easy to understand, and encourages crazy fast vegetative growth because roots have direct access to everything they need.
- The downside: If the power goes out or your air pump fails, your roots can suffocate in just a few hours. Keeping the water temperature cool on hot days can also be a challenge.
H3: Ebb and Flow (Flood and Drain)
The Ebb and Flow system, sometimes called flood and drain, is another great choice that adds a bit more automation. It works by periodically flooding a grow tray with nutrient solution from a separate tank and then letting it drain back out. A simple timer controls the whole cycle, which usually repeats a few times a day.
This wet-and-dry cycle is awesome for roots. They get a deep soak in nutrients during the flood, and then get exposed to plenty of fresh air as the water drains away.
This system is super versatile. You can run it with a bunch of individual pots or a single large tray, making it easy to adapt to different grow tent sizes and plant counts. It’s a perfect middle-ground option for many growers.
H3: Nutrient Film Technique (NFT)
Now we’re getting into slightly more advanced stuff. With a Nutrient Film Technique (NFT) system, the roots don’t sit in a growing medium at all. Instead, plants are suspended in channels where a very thin, continuous stream, or “film”, of nutrient solution flows along the bottom, constantly bathing the root tips.
This method delivers a perfect balance of nutrients and oxygen, which can lead to some seriously impressive growth rates. It’s a favorite in commercial greenhouses for a reason.
The catch? NFT systems are way less forgiving than DWC or Ebb & Flow. A pump failure is a huge problem, as the roots can dry out and die in just a few hours. You have to be on top of checking your equipment.
Comparing Hydroponic Systems for Home Growers
To help you see the differences and find what works for you, here’s a quick comparison of the most common systems. This table should help you figure out which setup vibes with your space, budget, and experience level.
| System Type | Best For | Cost | Maintenance Level |
|---|---|---|---|
| Deep Water Culture (DWC) | Beginners, small spaces, and promoting fast vegetative growth. | Low | Low-to-Medium |
| Ebb & Flow | Growers seeking versatility and an automated feeding cycle. | Medium | Medium |
| Nutrient Film Technique (NFT) | Experienced growers focused on maximizing efficiency and yield. | Medium-to-High | High |
| Drip System | Growers who want precise control, often used in larger setups. | Medium | Medium |
At the end of the day, no matter which system you choose, the goal is always the same: deliver water, nutrients, and oxygen to the roots as efficiently as possible. All of these methods can produce incredible results, especially when paired with high-quality feminized or autoflower cultivars. The “best” one is simply the one that works best for you and your garden.
Gathering Your Essential Hydroponics Gear
Alright, now for the fun part: the shopping. Before you can get your hands dirty, or in this case, wet, you need to get the right gear. Think of this as the blueprint for a killer hydro setup. We’ll cover everything you absolutely need to get started.
Getting your equipment sorted out is half the battle. We’ll walk through the must-haves, break down what each piece actually does, and give you some real talk on where you can save a few bucks versus where it pays to invest in quality. Let’s get you ready to grow.
The Heart of Your System
The core parts of any hydro setup are pretty much the same. These are the things you can’t skip, the parts that keep your plants alive.
Your reservoir is the foundation. This is just a lightproof container that holds your nutrient-rich water. It could be as simple as a 5-gallon bucket for a small DWC setup or a larger plastic tote for an Ebb & Flow system. The key is making sure it’s opaque to stop algae from crashing the party.
Next up, the pumps. A water pump is the workhorse in systems like Ebb & Flow or drip, moving the nutrient solution from your reservoir to your plants. For DWC, you’ll use an air pump and air stones to constantly bubble oxygen into the water, something your roots absolutely need to thrive.
Creating the Perfect Environment
Once you’ve sorted out the water delivery, you need to build the perfect home for your plants. This starts with a solid grow medium and the right lighting.
Instead of soil, you’ll use an inert grow medium to give your plants’ roots something to hold onto. The most popular choices are:
- Rockwool cubes: These are awesome for starting seeds and clones. They hold a ton of water while still providing great aeration.
- Clay pebbles (hydroton): Reusable and fantastic for drainage and root support, these are perfect for filling net pots in DWC or Ebb & Flow trays.
- Coco coir: This is a great middle-ground option. It feels a bit like soil but functions as a hydroponic medium, holding moisture well while letting plenty of oxygen through.
Of course, your plants need light to live. A quality grow light is one area where you really don’t want to cheap out. Full-spectrum LED lights are the standard these days because they’re energy-efficient, run cool, and can be tuned to your plants’ specific growth stages. Better light means bigger, denser buds. It’s that simple.
A common rookie mistake is underestimating ventilation. Your plants need fresh air to breathe and stay healthy. A simple setup with an inline fan and a carbon filter will keep heat in check, control humidity, and lock down any telltale smells.
Monitoring and Nutrients
The final pieces of the puzzle are the tools that let you play plant god. In hydroponics, you are in total control of your plant’s diet, which means you need the right instruments to monitor their world.
You’ll need a pH testing kit or a digital pen to keep your water in that sweet spot, which is typically between 5.5 and 6.5. You’ll also want a TDS or EC meter to measure the nutrient strength in your solution. Think of these tools as your eyes and ears; they tell you exactly what your plants are experiencing.
The cannabis vertical farming market, which is powered by hydroponic systems, is set for huge growth. For new growers, the appeal is the simplicity and fast turnaround, letting you harvest in weeks instead of months. Small farms can easily scale up with stackable racks, and new tech lets you monitor everything from your phone. Read more about the projected market growth on businesswire.com.
Your Guide to System Setup and Operation
Alright, you’ve got your gear. Now it’s time to put it all together and turn that pile of parts into a high-performance grow machine. This is where the magic really starts. We’ll walk through the whole process, from setting up your reservoir to gently placing your seedlings into their new soilless home.
This isn’t about figuring out a complicated manual. It’s about clear, simple steps to get your hydroponics weed system humming. Let’s get this thing built so you can get to the fun part: growing.
First Things First: Assembling Your System
Before you even think about adding water or nutrients, do a dry run. Seriously. Put your reservoir where it’s going to live, place your grow tray or buckets, and connect all the pumps and tubing. Make sure everything fits comfortably in your space and that your power cords can reach your outlets without creating a tangled, hazardous mess.
Now, check for leaks. It’s way better to find a loose connection with regular water than with a reservoir full of expensive nutrients. Fill the system with plain tap water and let the pumps run for an hour.
Once you’re confident it’s watertight, drain the system and give everything a quick wipe-down. Now you’re ready to mix your first batch of plant food.
Mixing Nutrients and Dialing in pH
This step is super important, but it’s not rocket science. Your nutrient bottle will have instructions, usually telling you how much to add per gallon of water. A word to the wise: always add the nutrients to the water, never the other way around. This little habit prevents nutrient lockout.
Go easy at first. I recommend starting with a weaker solution, maybe 50-75% of the recommended strength for your first week. Young plants are like babies; you don’t want to overfeed them. You can always increase the strength later as they get bigger and hungrier.
After mixing, it’s time to check your pH. The sweet spot for cannabis in hydro is a narrow window between 5.5 and 6.5. This is the range where your plants can actually absorb all the different nutrients you’re feeding them. Use your pH pen to get a reading, then add tiny amounts of pH Up or pH Down solution to adjust it. Add a bit, stir well, and re-test until you hit your target. For a deeper look at this, check out our full guide on how to raise the pH of water.
Germinating Your Seeds and Transplanting
While your system is getting its final checks, it’s time to pop those seeds. Here at Pacific Seed Bank, we only carry autoflower and feminized cultivars, which takes all the guesswork out of getting bud-producing female plants.
The paper towel method is a classic for a reason. It just works.
- Lightly dampen a couple of paper towels. They should be moist, not sopping wet.
- Place your seeds between the towels and slide them into a plastic baggie or between two plates to trap the moisture.
- Stash them in a warm, dark place, like on top of your fridge or in a kitchen cabinet.
- Check them daily. In about 24-72 hours, you should see a tiny white taproot peeking out.
Once that taproot is about a quarter-inch long, it’s transplant time. Gently place the seed, root-down, into a rockwool cube that you’ve pre-soaked in pH-balanced water. Be super careful not to touch or damage that delicate root.
Let the seedling grow in the cube for a week or so, until you see roots poking out of the bottom. Now it’s strong enough for the main event. Just place the whole cube into a net pot, surround it with clay pebbles for support, and you’re officially growing.
Pro tip: Never bury the seedling too deep in the rockwool. You want the top of the seed just barely covered. Planting it too deep forces the sprout to work too hard to reach the light.
Your Weekly Hydroponics Routine
Consistency is everything in hydro. Your plants depend on you to keep their environment stable, so a simple weekly routine will head off most common problems before they even start.
A quick daily check-in is a must. Just look at your plants. Are the leaves perky or drooping? Are they a healthy green or showing hints of yellow? Make sure your pumps are running and water is flowing as it should. This five-minute check can save you a world of hurt.
Once a week, you’ll need to do a full reservoir check-up.
- Check Water Level: Top off the reservoir with fresh, pH-balanced water to replace what the plants have drunk.
- Monitor Nutrient Strength: Use your TDS or EC meter to see where the nutrient concentration is at. If it’s creeping up or dropping too low, it’s time for a full water change.
- Inspect the Roots: If you can, take a look at the roots. They should be bright white and look healthy, not brown, slimy, or smelly.
- Keep It Clean: Every 7-14 days, completely drain your reservoir and mix a fresh batch of nutrient solution. This prevents salt buildup and ensures your plants get a perfectly balanced meal.
This might sound like a lot at first, but it quickly becomes second nature. A well-maintained hydroponics weed system is an incredibly efficient way to grow, giving you total control and setting you up for some seriously impressive harvests.
How to Troubleshoot Common Hydro Problems
Even with the best setup, things can go wrong. A perfect hydroponics weed system can still hit a few bumps, but the trick is knowing how to spot and fix issues before they mess up your whole harvest. Think of this as your field guide to the most common hydro headaches.
We’ll cover the big ones: root rot, nutrient lockout, wild pH swings, and that annoying green slime known as algae. Learning the early warning signs is half the battle, and acting fast is the other half.
Dealing with Root Rot
Root rot is the stuff of nightmares for hydro growers. You check on your plants and see that the once-bright, white roots are now brown, slimy, and giving off a funky, swampy smell. This is a huge problem for your garden.
It’s usually caused by a lack of oxygen in the water. This can happen if your air pump dies, the water temperature gets too warm (warm water holds less oxygen), or bad bacteria take over.
To fix it, you need to act immediately:
- Clean Everything: Gently rinse the roots under cool water to wash off the slime. Then, completely drain and sterilize your reservoir, buckets, and any tubing.
- Boost Oxygen: Make sure your air pump is powerful enough for your reservoir and that your air stones are bubbling like crazy. In DWC systems, more bubbles are always better.
- Add Good Bacteria: Consider using a beneficial bacteria supplement. These products introduce good microbes that outcompete the bad guys and protect your roots.
What is Nutrient Lockout
Ever had a plant that looks hungry even though you’re feeding it? That’s likely nutrient lockout. It happens when the pH of your water drifts too far out of the sweet spot, which for hydro is 5.5 to 6.5. When the pH is off, your plants literally can’t absorb certain nutrients, even if they’re floating right there in the water.
You might see yellowing leaves or other signs of deficiencies. This is a common reason folks ask us why their weed leaves are turning yellow, and an off-balance pH is often the cause. The fix is to reset your system.
The fastest way to solve lockout is to do a full reservoir change with fresh, perfectly pH-balanced water and a mild nutrient solution. This gives your plants a clean slate and lets them start eating properly again.
Taming pH Swings and Algae
Wild pH swings can stress your plants out and lead to the lockout we just talked about. Your pH can fluctuate for a few reasons, like plants absorbing nutrients or algae growth. Yes, that green gunk can actually change your water’s chemistry.
Preventing algae is your best defense. Keep your reservoir completely dark, as algae need light to grow. Make sure any lids fit tightly and that no light is leaking into your system. If you do spot some green stuff, clean it out and block the light source.
Within the cannabis world, hydroponics is the fastest-growing way to grow, partly because it allows for higher cannabinoid potency in a controlled setting. For home growers, the shorter growth cycles are a huge win, especially when growing autoflower cultivars from Pacific Seed Bank that can finish in just 8-10 weeks under LED lights. You can find more insights on the rise of cannabis cultivation technology on rootsanalysis.com.
The key takeaway here is to be proactive. A quick daily check of your system can help you catch these problems when they’re small and easy to manage. Keeping your hydroponics weed system clean and dialed in means you’ll spend less time fixing problems and more time admiring your thriving plants.
Ready to start your soilless journey with top-tier genetics? Pacific Seed Bank has over 1,400 autoflower and feminized cultivars perfect for any hydroponics weed system. Find your next favorite strain and start growing today at https://pacificseedbank.com.
FAQs
Is a Hydroponics Weed System Hard for Beginners?
Honestly, it can look intimidating from the outside, but some hydroponic methods are surprisingly beginner-friendly. A Deep Water Culture (DWC) setup, for instance, is a great place to start.
Once you get into the rhythm of mixing nutrients and checking the pH, many people find it’s actually easier than growing in soil. You get total control over what your plants are eating and don’t have to deal with nearly as many pests. It’s less about having a “green thumb” and more about establishing a solid, consistent routine.
How Often Do I Need to Change the Reservoir Water?
A solid rule of thumb is to completely swap out the nutrient solution in your reservoir every 7 to 14 days. This simple step prevents mineral salts from building up and guarantees your plants have a fresh, balanced meal ready whenever they’re hungry.
If you’re running a smaller system, a weekly change is probably your best move. For larger reservoirs, you can often stretch it to two weeks without any issues. It’s also a smart habit to top off the reservoir with pH-balanced water between your full changes.
The great thing about hydro is that almost any cultivar can absolutely crush it! Because you’re in the driver’s seat with nutrients, you can tailor the environment to exactly what the plant wants.
What Are the Best Cultivars for a Hydroponic System?
Cultivars known for their strong growth and big yields tend to do great in a hydroponics weed system. Many growers find that both our autoflowering and feminized cultivars from Pacific Seed Bank are perfect for soilless setups.
Autoflowers are incredible for anyone looking for a quick turnaround from seed to harvest.
Feminized photoperiod cultivars give you full control over the vegetative stage, which means you can grow some absolute monsters with massive yields.
Can I Switch a Plant from Soil to Hydroponics?
This is a really tough one, and to be frank, we don’t recommend it. Trying to move an established plant from soil into a hydro system puts a huge amount of stress on the roots.
You’d have to carefully wash away every last speck of dirt without damaging the delicate root hairs, which can easily send the plant into shock. It’s far safer and more effective to start your seeds or clones directly in a hydroponic-friendly medium like rockwool from the very beginning. This gives them the best possible start in their new soilless home.


